Sunday, January 30, 2011

Make and Take Challenge #2

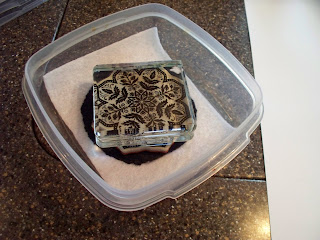
Here is my demo for Challenge #2.  Let me first say that I learned this technique from my Stampin Up demonstrator Vicky Frescas. 

Materials needed:
  • A shallow plastic bowl
  • white felt
  • a rubber stamp of your choosing (this does not work very well with acrylic stamps)
  • 4 or 5 of the Stampin Up ink refill bottles
  • White cardstock

Instructions:
  1. Place felt in shallow plastic container
  2. Take first ink refill and squeeze out into a circle in the middle of the felt
  3. Repeat around the circle build out as you go along
  4. Press stamp down hard into the felt to get good coverage
  5. If you seal this up, it will last quite a while.
  6. Have fun with this! 


Wednesday, January 26, 2011

Merlene's paint the Fiskateer Gallery Orange Challenge


This is my card for Merlene's challenge on Fiskateers. 

Materials used were:
The Paper Studio Card Stock in:  Orange, Green, and White
Fiskar's Paper Cutter and Micro Tip Scissors
Tim Holtz blending tool
Ranger Distress ink in brown (not sure of the exact color, sorry.  My goal was to make it have a tint of orange)
Scor Pal
Stampin Up:  Day of Gratitude Stamp Set
Stampin Up:  Extra Large Decorative Label Punch
Stampin Up:  Refill Inks in:  More Mustard, Cajun Craze, Cherry Cobbler, Garden Green
The Stamps of Life:  Creative Signatures Stamp set (on the back of the card).
One piece of felt
A plastic container that is pretty flat.

Instructions:
  1. Cut orange cardstock 11 1/2 x 5 3/4" and score in half using the scor pal.
  2. Cut three green pieces of cardstock 5 1/2" square.  Two are for mats on the inside of the card.
  3. Cut white cardstock 5" square
  4. Cut green strip of cardstock 5 1/2" x 1" and tear on both ends.
  5. Take white cardstock and using the Scor Pal score every 1/2 inch, then turn and do that again.  I learned this technique on Stamp TV.
  6. Using Tim Holtz blending tool and Range Distress Ink, ink and blend over the squares of the white cardstock to make the lines pop.  I learned this technique on Stamp TV.
  7. Put the piece of felt inside the flat plastic container.  Get your Stampin Up refill inks and squeeze ink out in circles onto the felt.  Make a small circle, then use another color to circle around that circle and so on.  Make the circles big enough to fit your largest stamp.  It should look kind of like a target when you are finished.  I learned this technique from my Stampin Up Demonstrator Vicky Frescas.
  8. Stamp flower, leaves, and sentiment. 
  9. Cut out flower and leaves and punch out the sentiment. 
  10. Ink edges of flowes, leaves, and sentiment.
  11. Adhere green cardstock inside as mats
  12. Adhere green cardstock outside as mat
  13. Adhere white cardstock on top of green card stock
  14. Adhere green torn cardstock strip
  15. Using dimensionals, adhere big flower and sentiment
  16. Adhere leaves
Thanks for looking, and wishing you a wonderful day.

Monday, January 10, 2011

Thank you note!

Here is a Thank you note I created!


The Die is from Sizzix and is called Top Note, the punches were ordered from Stampin Up, but are the EK Success brand.  Thanks!

Birthday card

Here is another birthday club card I have made:

Thank you for looking!